



Showing posts with label nail varnish. Show all posts

Wednesday, 28 March 2012

Bling went bleuggh!…and “Just Because”

I’m not great at “blinging” my cards and it’s doubly difficult for my blog as I cant use any of my commercially produced cardmaking stuff…what I do have is some old iron on stones and some “Belly button” jewellery (very sparkly actually) that belonged to my girls.  I needed these for this weeks Less is Mores challenge. This week they have challenged us to combine three of the previous challenges, fab for me as this has given me chance to catch up on some challenges I missed when I fell into my blog hole last year.

I went back to Week 18 [Jun 4th]  Monochrome, Week 19 [Jun 11th]  In the Frame, Week 20 [Jun18th]  Monogram…..the only trouble is I had to abandon Monochrome as I needed to add a “touch of red” (Week 9) as the card began to look very Weddingy! (not a proper word), I bit the bullet and went for ……Week 43 [Nov 26th]  Bit of Bling.

S1052527

I found a fab frame here http://www.edupics.com/coloring-page-frame-i11330.html and used “RAGE” font inside a text box, to create a Monogram. I printed the design on my basecard and on a scrap of card, so that I could cut out the letter….I hate cutting out especially circles, generally I neaten cut edges by filing them,  this time I filed it from back to front to create a little gutter/ridge so that I could faux enamel the panel, it took two coats of nail polish to create a shiny finish and I found it easier to just tip it on….sadly this is where it went a bit bleauggh I had already stuck the diamantes into the first layer of nail varnish….the second layer went over them and just made them look like little clear dollops!!!!!!!!!

S1052522 S1052537

As this is a hand delivered card I went to town with the dimension and mounted the panel on corrugated card, this was covered with a scrap of ribbon tied round and finished with a bow. I loved the frame so much I decided to use it again and repeat the design on an insert but this time with the greeting inside.

S1052528

As I have sooooooo many weeks to catch up with I decided I had time to make a quick “Just because” card. These are some of my favourite cards to make….generally quite daft and for no real occasion….just because!!! I love leaving silly notes and cards for my family particularly if I think they could do with some encouragement or cheering up. I always left little hidden cards in my daughters school bags or lunch boxes….I have even hidden them in sandwiches!!!!

This little stone has been sitting on my desk since our last holiday and I thought he would make a cute mouse.

S1052526

Recipe for this one …..Week 18 [Jun 4th]  Monochrome (thought I better have another go)….Week 23 [July 9th] Something with Legs (if he was real…he would have legs!!!)……Week 28 [Aug 13th] Use Ink (*hang head sheepishly*…my pen had ink in it …does that count?)

Well the card was extremely quick to make…but rubbish to photograph….I know…I will photograph it out in the sunshine…..bad idea….my very needy cat thought I had come to lay in the grass with her and of course she had to get right under my noseS1052538 so I moved it…S1052541

S1052544moved it again..S1052546

and again ……and again….        S1052547       

ok I give up…

I will take your picture then!!!!!!!!!


She’s not bad for an old girl (17!) and no she isn’t winking she only has one eye!!!

………P. S. Steve….. the grass needs cutting



Monday, 28 March 2011

Knew I kept them for a reason!


Well it's sketch time at LESS IS MORE....mmmm.....I have a bit of a love/hate relationship with sketches.....but I like a challenge.... and FAB N FUNKY have "a do it more than once" challenge (multiple folds on a card), so I decided to flip Mandi and Chrissie's sketch and add in some extra folds for a little something extra (also wanted to use up more scraps!!) I took a couple of 10cm wide strips of card scored a couple of flaps either end of the longer white strip and created a hinge on the black strip, leaving it long enough to tuck under the white flap on the right.


I then attached these together with photo glue (nice and repositionable).


The wonderful little image was from Meljen's designs which I found through Free Digital stamps. The image is perfect for my husbands Anniversary card (he's and electrician so particularly apt!)


Again I was faced with colouring an inkjet image without promarkers!?! chalks were too dull.... it was then I decided to go in for the kill......lurking in my gel pen draw were some flourescent gel pens inherited from my girls......I actually thought they were disgusting but as I never throw anything away......I felt sure they would come in useful for something......


....FINALLY their moment to shine (literally) has come....and incredibly they still worked (they are years old!!!) I did find that the printer ink could still be picked up with these but as they were a fine rollerball I could manage to colour in carefully without to much disaster. In fact I was impressed how well they flowed and blended, but to give it a finishing shine I covered it in clear nail varnish....three coats...had to do a third as I managed to stick my thumb print on the second (ooops, wasn't dry!).


I created the message in Word and highlighted the "light" word with the gel pen, Mandi (Less is More)has done a clever little tutorial on matching font colour to computer generated images, I really must have a go at this. It's so nice to have such helpful tips, it's fun joining in challenges but learning something new is a great bonus.


Now for the big question. .....is there a crafting black hole/Bermuda triangle?


Last week I had to do a bit of batch card making, I am completely rubbish at tidying up as I go along, so gradually the desk disappears...and so does things that I need....as I worked I lost my lovely metal handle Swann Morton knife, my Fiskars double ended embossing tool, my medium embossing tool and the new disposable Swann Morton knife I got out to replace the missing metal one! Now my lovely little craft room (was Gina's bedroom, so it's a special place for me), is not very big, so they cant have gone far,....... I surrendered and tidied everything back in it's place......STILL MISSING...this is nuts they have to be here.


Every week as I am nosing round blogs I see WOYWW where lovely crafters take a snap shot of their desks etc and show whats there.....


......well I have decided to start WOYCSF (What's on your craft space floor!!!!!!) because this, during my search, is what I found hiding..... and I didn't know they were missing


and you guessed it.....no knives or embossing tools ????????????!!!!!!!!!!

They are officially .......Looooooost ........innnnnnnnn........Spaaaaaaaaaaaace!?!


Tuesday, 1 February 2011

TAKEAWAY CALENDAR CARD

I've designed this card for Allsorts Challenge which is "use something not designed for cardmaking"...well as my blog is all about slightly alternative papercrafting this is really up my street... but I really wanted to use something I have never used before... so as I ended up with duplicate calendars from our wonderful local takeaway (no I do not eat that many takeaways...but my daughter's..bestfriend's...partner's...family own it!! so they are always very generous to us...thank you Christine and Darren), I decided to sacrifice one and utilise the very pretty design on a card.


In fact all the stuff is recycled. Raffia from a posy of flowers I received a long time ago, a fabric flower from an artificial bunch, old nail varnish, ordinary stationary split pins, and the card base was created by sandwiching an off-cut of brown card with a piece of ivory card


I found the calender easy to cut but found one of the edges frayed and fell apart quickly so that section I supported on the back with tape and cut through the middle.


I didn't like the shiny pin heads so I covered these with nail varnish and put some of the nail varnish in the middle of the flower to cover the hole (this had the plastic fixing pushed through the centre, which I had removed), unfortunately the nail varnish has separated and was very runny which sunk into the fabric.....LUCKILY I had saved some shiny bits from a previous
project so I sprinkled these on ...I am a serious hoarder... these were the little tiny bits that fell off the scouring pads I cut up for my Cute as a button card...but I knew they would come in for something!!!!!!

Finally as the calendar was made from a compressed paper and the back was lovely and white, I couldn't resist trying this with a proper rubber stamp...I did ink the stamp with waterbased brush markers, so again cost effective...but it still stamped beautifully. I turned this into a quick topper with a scrap of the brown card and a piece of embroidery thread, I only attached this along the top so it hangs nicely like a mini blind!
... the cards needs finishing but I will save this for when the occasion arises.

As QUICK CARDS MAGAZINE has a competition celebrating Chinese New Year I may send this off for that.


Monday, 7 June 2010

BAD BLOGGER!!!

O.k I hang my head in shame, I am a disgrace to the blogging community as I have been a.w.o.l. I do have very good excuses!! some exciting some a bit traumatic but I do feel ashamed as I know lots of people out there seem to be far more successful at juggling, work, family, craft and blogging at the same time. I so wish I was more organised!!


Anyway apologies!! I know I mostly talk to myself but just in case anyone is out there....sorry!
I have been busy crafting, very exciting as I have now completed two commissions for Simply cards and Papercrafts, very time consuming and slightly anxious putting my stuff in print.

Next month I shall hopefully be the Guest Designer on the Banana Frog Blog. Bev makes some great sets which I think are fab for anyone especially if you are starting out. I recently used The Superlicious Set in conjunction with some recycled stuff. An old manilla file, Paper Primark bags, some emulsion paint and nail varnish. The only other thing needed is a black inkpad

First I lightly painted the bags, allowed these to dry before stamping the flowers and cutting them out.

I created a Pocket Tag card from the folder (I will post details next time if anyone wants further info).

Then decorated the card with strips of the painted paper and the flowers. I added some doodles and embellished the flowers and card with the nail varnish.

I made this for a friend at work, the tins of paint had been hanging around forever in a cupboard, and I volunteered to dispose of them as the colours didn't match anything anyway....but I couldn't help myself I had to use them, so they have now joined my little collection of testerpots, it's so great because I would never have used that colour selection in a million years. That's what I so like about recycling, it often takes you out of your comfort zone and different possibilites open up.

What was also fab was my friend who is not a cardmaker or considers herself arty, took the trouble to make me a card for my birthday and it was absolutely brilliant, she very simply doodled some lines and drew some lovely red Poppies, it was so effective.....Thank you Eug!!!


Sunday, 21 February 2010

Daisy + dishwasher tablet box

I created this card for Clare's weekly challenge, the challenge has a lovely photo of a daisy and ladybird...perfect I thought as I had just salvaged a large daisy from a shopping bag (it had originally belonged to my daughters, I rescued it and kept it for my cleaning stuff and obviously I used it so much.. it split...believe that and you'll believe anything!!).
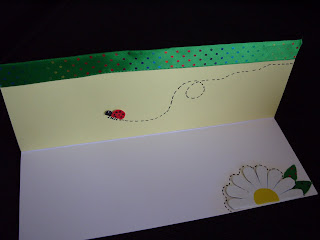

It was a double layered flower and quite huge so I pulled it apart and used only half of it. It wasn't until last night after I had finished the front that I realised my dishwasher tablet box had a matching daisy on the lid....so had to use that as an embellishment inside. Where possible I like to decorate the inside of the card as I think this always finishes the card off... but in this case it was a necessity as again I used a card that was previously used. I turned it inside out and covered the inside damaged flap with paper.

I also wanted to hide the raw edge of the flower with ribbon...I would have preferred a lime green narrow ribbon but the closest one I had was from a Tesco Birthday cake, I loved the spots as I thought they went well with the ladybird but it was too wide. I stuck it along and was going to trim it off but then decided to wrap it round, it's given a lovely bound edge feel to the card so was quite pleased with the effect.

I used makeup to tint the card, this echoed the shaded centre of the daisy and made it stand out on the white. The ladybird body and head was drawn on a scrap of card and cut out, I also cut out a centre for the daisy, these were covered in nail varnish to create a glossy finish but the nail varnish soaked in the yellow card quite a bit and made the card a darker colour than I wanted.
I used the tippex to create an eye for the ladybird and as the grey card core was exposed on the dishwasher daisy, I ran the tippex round the edge to colour it white.
The card was finished with a doodle border and greeting and legs drawn on the ladybirds. last touch was a hand tied button as an accent.


Sunday, 7 February 2010

ROSE CARD (Plus making paper roses)

I have made this card for two challenges http://creativecraftchallenges.blogspot.com/2010/02/challenge-6-roses-are-red.html%20which which has a rose theme. (lovely to see Creative Craft Challenges up and running again.

and Claire's Weekly challenge which has an inspiration picture
The picture is of roses in a heart shape on a bed, as the bed is possibly a hotel bed I thought I would add some chocolate into the mixture as in a posh hotel you might be lucky enough to have a chocolate left on the pillow!!


I created an easel card out of a scrap of ivory coloured card then cut out a heart from another card, as the card didn't match I coloured it pink - Wet around the heart with a very wet paintbrush use a felt tip pen and draw round the wet edge allowing it to bleed, use the brush again to draw the colour over the entire surface. Before it dries use a darker pen around the very edge of the heart. Once dry draw doodles and hearts on top corner. Front panel has the top torn and was tinted in the same way as the heart. Attach the heart to the front panel creating a pocket (silicone glue or a wet adhesive which is held in place with a peg until it dries, is best for this).
I have lightly glued the chocs in the pocket along with some packaging used in gift parcels. I also used some nail varnish on the flowers but wishes I hadn't, it wasn't as sparkly as I expected.....Moral of story...always test ideas on scraps first!!!!!


TO MAKE PAPER ROSES :-


Cut a strip of paper (size depends on the size rose you require)

Pleat strip, then cut a petal shape DON'T FORGET TO ALLOW A PIECE AT THE BOTTOM OF THE PETAL EACH SIDE, THAT REMAINS ATTACHED!!

Unfold the row of petals....on soft mouse mat rub the handle of your scissors on each petal to make them curl.

Dab glue all the way along the straight edge. (oops!..glue is not visible in picture...that could be because I forgot to put it all the way along....!!!)

Roll the strip around the tip of a cocktail stick, nipping the base as tight as possible.

Shape petals, than take stick out and allow to dry.

To make a fuller rose , add another row of petals, facing the curls outwards.

The base of these roses can be a bit bulky but they can be hidden in a group or behind something as I did, or disguise them with leaves.


Thursday, 4 February 2010

Blog Hop Card

There is a lovely blog hop on http://stamping-fantasies.blogspot.com/2010/02/sir-stampalot-challenge-and-blog-hop.html. It is to celebrate the move of Sir Stampalot to new premises. There is a fantastic prize and the opportunity to hop round some fantastic blogs. To finish the hop you need to create a project on the theme of "Moving".
Soooo this is my contribution. It is made from a very old and tatty document wallet. the three folds it had, gave me the idea to do a tri- fold card....the only trouble was, the card ended up so huge I had to cut it down which then left the fold in the wrong place. I would have started again but I had already, very firmly stuck the Peterborough map (from very outdated road atlas) onto the card!!! Arrows always suggest movement to me so I went for that combined with a travel theme.The little lorry is just two small rectangles joined together (round off the top corners), draw a window on the cab, then stick some black buttons on for wheels, The centre has been painted with silver nail varnish to create the look of hub caps. The signs and circle were created on the PC in Word...they were then printed on gloss photo paper (from poundshop!).Finish the card by inking the edge with pen ink and daubers , and doodle stitch detail as a border around the circle.


Monday, 30 November 2009

Music card


As I forgot to mention music sheets in my listings of useful paper I thought I would use it for Creative Crafts next challenge http://creativecraftchallenges.blogspot.com/2009/11/creative-craft-challenges-3.html.
It is also useful as yet again I am late sending a card to one of my nephews and as he is from a musical family this seemed appropriate, (although I'm not sure if he will know what the round black thing is!!!!!). The backing paper is salvaged from a promotional folder all the other bits are scraps and the music is from a damgaged music book, of which I have many in my piano stool......have got the stool, just haven't got the piano anymore......I was rubbish anyway!! The record is one of my husbands 45" singles which is collecting dust behind the sofa......and if you're reading this Steve..... of course I was careful! I scanned the record and reduced it in a word document. Again the sentiment is handwritten and the top notes have dots of black nail varnish on them.