Sunday 21 February 2010

Daisy + dishwasher tablet box

I created this card for Clare's weekly challenge, the challenge has a lovely photo of a daisy and ladybird...perfect I thought as I had just salvaged a large daisy from a shopping bag (it had originally belonged to my daughters, I rescued it and kept it for my cleaning stuff and obviously I used it so much.. it split...believe that and you'll believe anything!!).


It was a double layered flower and quite huge so I pulled it apart and used only half of it. It wasn't until last night after I had finished the front that I realised my dishwasher tablet box had a matching daisy on the lid....so had to use that as an embellishment inside. Where possible I like to decorate the inside of the card as I think this always finishes the card off... but in this case it was a necessity as again I used a card that was previously used. I turned it inside out and covered the inside damaged flap with paper.

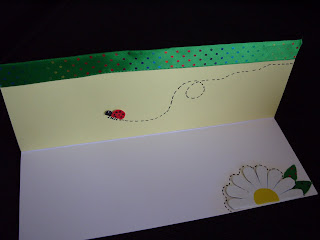
I also wanted to hide the raw edge of the flower with ribbon...I would have preferred a lime green narrow ribbon but the closest one I had was from a Tesco Birthday cake, I loved the spots as I thought they went well with the ladybird but it was too wide. I stuck it along and was going to trim it off but then decided to wrap it round, it's given a lovely bound edge feel to the card so was quite pleased with the effect.

I used makeup to tint the card, this echoed the shaded centre of the daisy and made it stand out on the white. The ladybird body and head was drawn on a scrap of card and cut out, I also cut out a centre for the daisy, these were covered in nail varnish to create a glossy finish but the nail varnish soaked in the yellow card quite a bit and made the card a darker colour than I wanted.
I used the tippex to create an eye for the ladybird and as the grey card core was exposed on the dishwasher daisy, I ran the tippex round the edge to colour it white.
The card was finished with a doodle border and greeting and legs drawn on the ladybirds. last touch was a hand tied button as an accent.


Thursday 18 February 2010

TORN CIRCLES...the final frontier


Right I am beginning to bore myself but I just used up some scraps and a magazine I was about to throw out, to create one last circle card (well for the time being!!). This time I just wanted to see what it looked like if I didn't use just plain water (see Torn circles post), instead I created a wash by scribbling felt pen ink on a tile then picking up the ink with the wet brush. It shows up quite well on the light paper and creates the slight effect of another mat but I don't think it shows on the magazine pictures.

Right I am banned from using torn circles.....oh til at least....March???!


Wednesday 17 February 2010

TORN CIRCLES...apertures.

O.K. now I'm getting obsessive...I noticed when I tore my last circle that it came out cleanly.....soooo I thought I would have a go a creating an aperture on a card blank. Again it worked well, it had to be scored and soaked several times and left inbetween but it tore away easily. the only trouble was, it was a damaged card blank so I had to cover the front to disguise the marks., which also meant I had to redo the aperture not difficult but I should have waited til the front had dried properly (I used PVA with the brown paper and that made it quite soggy and floppy!).


I have to mention the backing paper, I picked up and invaluable tip from June (Flowerbud) on Docrafts forum, she introduced me to Wordle a free online text programme, it's very simple and quite addictive to play with and you can create some great unique and personalised backing papers. I will have to explore this further, but I used one of my test pieces to cover the inside face of the card. I tissue dyed a heart on it as I will be entering it in the "hearts" challenge on the Daring Cardmakers blog. It also has the theme of music so I will enter it into the Creative Craft challenge "Music to my ears".


I created the embellishments from salvaged wire (it's extremely handy having an electrician husband...he strips the sleeving of scraps of wire for me...although I don't think this is standard household cable ...it's something to do with steel armoured underground cable...whatever... very handy and easy to bend!!). Salvaged beads from a necklace (Katie's not mine...I'm getting quite a collection, I'm glad she buys cheap jewellery, it breaks on a regular basis!), and the hanging ribbons from a top. The quote was PC printed on a scrap of card left over from my "moving" card.... a few doodles later............ I was left with a bit of a battered card!....I really should have let that front dry first!!!!!! Oh well live and learn.

Thanks again June for that tip


Tuesday 16 February 2010

TORN CIRCLES...and three wishes from three little mice.

Clare's Do crafts Weekly challenge has a sketch this time and as it features a circle I thought it was a good opportunity to see if I could tear thicker cardstock and be more precise than the torn flower circles in the last couple of posts. The colour scheme is inspired by the Van Gogh Painting which is the very first challenge on the new blog, SCRAP THE ART. This is a great new blog which is going to use pieces of art to inspire and challenge, and it is not specifically about painting and being an artist, it's purely a starting point.


So I went back to basics and just used cardstock and doodling with pens, as I did in my first posts.
I sketched three little mice (I called them Cheddar, Stylton, and Eeedam) I doodle these mice all the time (mainly on my telephone pad) and they are just based on a simple rounded wedge shape, they were coloured with watered down ink from my pens. I tinted the yellow piece of card (this really was a horrible colour so it needed disguising)with daubers and pens. I then used a wet paintbrush to flick water on the ink, after a few seconds dab the water off with a tissue.
I used a black pen to doodle the border (a modern "homage" to Van Gogh's swirls.
I did use one cheat and that was glitter, watered down PVA glue was flicked on with a brush then sprinkled with glitter...this was my final influence from "Starry night".

THE CIRCLES.....


It actually worked better than I thought BUT PATIENCE is the key.
Choose a circular container or lid and again work on a spongy surface like the back of a mouse mat. Hold the lid in place and draw round (scoring) with an embossing tool or knitting needle DON'T be tempted to press hard, I ripped through the first time and it did spoil the effect, it's best to let the water do the work.
Next draw round with a very wet paintbrush, allow it to soak for a minute or two. REPEAT the process, scoring then wetting....allow to soak in again. Make sure you always hold the lid in place. Once softened try pulling the outside card away, it should pull away quite easily and neatly, if not, repeat the soaking until it does, thicker card will need several goes, allow it soak in properly before pulling.
IF YOU CANT BE PATIENT ....THE WHOLE PROCES CAN BE INTANTLY SPEEDED UP BY ADDING SOME WASHING UP LIQUID TO THE WATER, JUST BE AWARE THIS CAN LEAVE A WATER MARK BEHIND ONCE DRIED.


Saturday 13 February 2010

HAPPY BIRTHDAY CAROLE


Just a quick post to wish my Manager Happy Birthday!! Pity we have to work today.

I did the ultimate recycling this morning . . .I recycled a recycled card...I used the last posts card and expanded on the design. We'll soon be having a card making workshop based on recycling. As we may be having all ages, the designs will have to very adaptable, so this was good practice...and a potential sample.

Anyway have a good day Carole....roll on lunch time.


Sunday 7 February 2010

BLOOMING MARVELLOUS

Just had a quick nose on the Daring Cardmakers blog and had to have a quick go as their theme is AMETHYST....and as I still had some Cadbury's (long may they continue!!!) choc's left over from last project sitting on my worktop, I thought they had to be incorporated in the challenge.

(yes amazing I hadn't eaten rest...although some are missing.....STEEEEEEVE.....please leave them alone!!!!)

So I have created a flower (two old envelopes and some wrapping paper) from the very rare Cadbury's chocolate plant!
The flower is simply created by drawing circles with a paintbrush and water, then tearing round the damp line, scuff the edges a bit more and tint with felt pens. Rub the centre of the circles with scissor handles to curve paper, layer and then attach together. The leaves are made the same way (I used a piece of paper tinted as described at the end of the dauber post).

The challenge has a lovely prize this week, a Martha Stewart Butterfly punch donated by http://www.craftobsessions.co.uk/


ROSE CARD (Plus making paper roses)

I have made this card for two challenges http://creativecraftchallenges.blogspot.com/2010/02/challenge-6-roses-are-red.html%20which which has a rose theme. (lovely to see Creative Craft Challenges up and running again.

and Claire's Weekly challenge which has an inspiration picture
The picture is of roses in a heart shape on a bed, as the bed is possibly a hotel bed I thought I would add some chocolate into the mixture as in a posh hotel you might be lucky enough to have a chocolate left on the pillow!!


I created an easel card out of a scrap of ivory coloured card then cut out a heart from another card, as the card didn't match I coloured it pink - Wet around the heart with a very wet paintbrush use a felt tip pen and draw round the wet edge allowing it to bleed, use the brush again to draw the colour over the entire surface. Before it dries use a darker pen around the very edge of the heart. Once dry draw doodles and hearts on top corner. Front panel has the top torn and was tinted in the same way as the heart. Attach the heart to the front panel creating a pocket (silicone glue or a wet adhesive which is held in place with a peg until it dries, is best for this).
I have lightly glued the chocs in the pocket along with some packaging used in gift parcels. I also used some nail varnish on the flowers but wishes I hadn't, it wasn't as sparkly as I expected.....Moral of story...always test ideas on scraps first!!!!!


TO MAKE PAPER ROSES :-


Cut a strip of paper (size depends on the size rose you require)

Pleat strip, then cut a petal shape DON'T FORGET TO ALLOW A PIECE AT THE BOTTOM OF THE PETAL EACH SIDE, THAT REMAINS ATTACHED!!

Unfold the row of petals....on soft mouse mat rub the handle of your scissors on each petal to make them curl.

Dab glue all the way along the straight edge. (oops!..glue is not visible in picture...that could be because I forgot to put it all the way along....!!!)

Roll the strip around the tip of a cocktail stick, nipping the base as tight as possible.

Shape petals, than take stick out and allow to dry.

To make a fuller rose , add another row of petals, facing the curls outwards.

The base of these roses can be a bit bulky but they can be hidden in a group or behind something as I did, or disguise them with leaves.


Thursday 4 February 2010

Blog Hop Card

There is a lovely blog hop on http://stamping-fantasies.blogspot.com/2010/02/sir-stampalot-challenge-and-blog-hop.html. It is to celebrate the move of Sir Stampalot to new premises. There is a fantastic prize and the opportunity to hop round some fantastic blogs. To finish the hop you need to create a project on the theme of "Moving".
Soooo this is my contribution. It is made from a very old and tatty document wallet. the three folds it had, gave me the idea to do a tri- fold card....the only trouble was, the card ended up so huge I had to cut it down which then left the fold in the wrong place. I would have started again but I had already, very firmly stuck the Peterborough map (from very outdated road atlas) onto the card!!! Arrows always suggest movement to me so I went for that combined with a travel theme.The little lorry is just two small rectangles joined together (round off the top corners), draw a window on the cab, then stick some black buttons on for wheels, The centre has been painted with silver nail varnish to create the look of hub caps. The signs and circle were created on the PC in Word...they were then printed on gloss photo paper (from poundshop!).Finish the card by inking the edge with pen ink and daubers , and doodle stitch detail as a border around the circle.


Monday 1 February 2010

School Days


Another quick card for a challenge. I just discovered the Daring Cardmakers Challenge Blog http://daringcardmakers.blogspot.com/and their theme is School. As I had saved a couple of Cracker Gifts (the protractor, and mini book) I thought they would make ideal embellishments for this challenge. I made the mini pencil from a cut down kebab stick. The pages were actually from an invoice book (I needed narrower lines than ordinary paper). I distressed the graph paper and card with ink spots....to do this I pierced a fountain pen cartridge.....it wasn't just the paper that was distressed....I ended up wearing quite a bit of it too!!!!!!
My inspiration came from my own school days, I spent a lot of time and ink writing lines and I had a talent for messy school books. I dedicate this card to my friend Tracey (soon be 46 Tracey oops did I let your age slip!!), we have known each other all our lives (that included school days!). Early Happy Birthday Tracey .....don't worry I'll catch you up soon.