Showing posts with label Claire's Challenge. Show all posts

Monday, 31 January 2011

DOODLE FLOWER


This was such a quick and simple card to make as well as extremely economical!
It only needed a black pen,and one small off cut of patterned paper, plus some foam pads to 3d the elements (although little off cuts of corrugated card glued both sides would have worked equally as well).
Once I had scribbled/ doodled some flowers on the patterned paper I roughly cut them out, added some extra doodled centres matted onto foam squares, some doodled leaves cut out and finished with a doodled border and handwritten sentiment

I thought this would be a cheerful card to send someone I know who is very under the weather.

The actual design was taken from Claire's challenge at Do crafts, so this detracts slightly from the clean and simple style I have tried to adopt this year, but I did resist the temptation to use ribbons and embellishments as the design used most areas of the card surface.
I was also inspired to doodle on patterned paper as the challenge at DYSU is "patterns". I really like this look and will experiment with this a bit more...it's a great way to use up scraps!


Monday, 17 January 2011

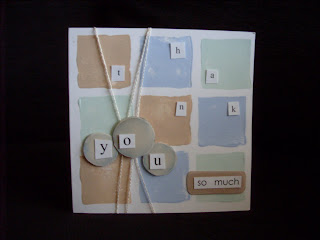
Beach Inspired


This was a very quick card to make....took a little bit longer waiting for the paint to dry!!!

It is for a couple of challenges and primarily for my B-I-L and his partner who recently wrote me a thank you letter..it was such a joy to receive a proper and entertaining letter in the post so I just wanted to acknowledge how much I appreciated the thought. As they live near the sea (lucky things can see the sea from their flat) I took inspiration from a beach look..... plus the tester pots I had in the shed were all very suitable for this theme.

The actual design was taken from Claire's sketch challenge at Do Crafts and the distressed look is the next challenge from DYSU , despite it being distressed I tried to keep to my resolution to keep it simple....slightly difficult bearing in mind the busy sketch plan and distressing which doesn't lend itself to simple!! but I did resist the temptation to doodle round the stamped blocks!

I have found a fab new ink blending tool......MEMORY FOAM INSOLES!! my daughter and I both had to fit some insoles in new shoes and luckily we both have small feet so there was plenty of off-cuts but they were only a £1 a pair anyway. I also cut a square of the foam to make my stamping block.

The design was completed by printing the lettering on my computer and randomly cut out then stuck on, some thread bought from the charity shop (20p!) pulled the design together.


Monday, 10 January 2011

ORCHID CHALLENGE


Well I am on a roll ...I just noticed Claires challenge at Do crafts and thought the thank you card I wanted to make for my Brother's Girlfriend fitted perfectly with the picture challenge.

As Tracy had bought me a beautiful orchid as an extra Christmas pressie I wanted to thank her and show her that it's still alive!!! In fact bearing in mind my fatal touch with plants I am really rather proud of myself.

I photographed the flowers and as an experiment I printed onto tissue to give it a softer oriental feel but still trying to keep to my resolution of "keeping it simple".

Here's a few guidelines if you're thinking of trying it .......learnt the hard way.
  • Check your tissue hasn't got a gloss coating....(I found mine had a matt finish on the back).....the gloss side didn't like the ink and it didn't dry properly .........messy mistake number 1 ....Solution print on matt side!
  • Attach the paper firmly along the top edge...I found it best to run a glue stick along the carrier paper and stick the tissue down ovelapping....then trim off excess...ALSO attach lightly along bottom....disastrous mistake number 2..if not attached properly, printer eats paper.....aaaaaaaaaggggghhhh!
  • If your paper has previously chewed the tissue ...do not put any other proper projects through printer....messy mistake number 3, ink will have been dumped all over roller and will need cleaning and scrap paper run through till clean.
  • Make sure the tissue is much larger than image printed and is printed only on the non- stuck down area..... otherwise expensive waste of ink mistake number 4.

Still despite the learning curve.... I was pleased with the result...I'm not sure it shows but it has a lovely soft fabric look to the image.
I left the image on the carrier sheet while i trimmed it in my trimmer...did wonder if I should have had a torn edge??
I then reattached this to card with a glue stick (apply the glue to card.......tissue too thin...mistake number 6!) then trimmed to leave a little white border. I wound a cord round the image(cut from a blind) and fastened the ends at the back, then finished the card by mounting the image on foam pads (or scraps of glued thick card) and adding a PC printed greeting embellished with my revolting (but great for cards) green glitter nailvarnish.


WINTER WISHES - Cute as a button/New Resolutions


I am a big fan of the blog Free Digital Stamps. Its an amazing site bringing together links for lots of free images that people create and generously share for free, and of course a perfect blog when considering card making on a budget. It's through this site I have discovered a great new challenge blog launched last week called Do You Stack Up. Their first challenge is called "Cute as a button". So I created this little snowman as a belated Christmas/Winter Wishes card for a young friend.

I actually didn't want to make the card too Christmassy. I ignored the wrapping paper I was going to use as a backing and decided to chop up some very pretty scouring pads I recently bought....they are so sparkly.... and soft!! (rubbish at scouring though!). I chopped a small square of card and covered it in wide doubled sided tape and stuck on some of the fabric I left a little overhanging edge to softly curl round
A little hat chopped from my teabag box, some of the green fabric for scarf and holly, some facial details with a permanent marker and a greeting from and old xmas card, finished my little snowman off.

I would also like to submit my card for Creative Craft Challenges, another great friendly challenge blog that I love joining in particularly as that blog started at the same time as my blog. their challenge is "New Year resolutions".....and my New Resolution is to try and "keep it simple". I love simple cards but am constantly tempted to overwork cards so I am going to try and not be tempted to keep fiddling with my cards!!....not sure how long that will last?!?


Sunday, 31 January 2010

NON-SOPPY VALENTINE!!

This is the valentine card I have made for my lovely hubbie, he hates soppy, cutesy images so it's quite hard sometimes to come up with something romantic, I thought this had quite an industrial look. It's made completely out of recycled packaging and card. The paper sticking out near the bottom is a recycled illustration from a damaged children's book. I used the image to inspire the doodles on the card. The key is from and old chest of drawers... I think!?! (we keep a pot with old keys, not sure why, they never fit anything!! but at least they're useful as embellishments). The wire is left over from a picture hanging kit. The message was printed on the computer.
I also used the dauber and inking technique described in the last posting. I will be entering the card in Claire's weekly Challenge at Do Crafts as it is based on her challenge sketch.