Showing posts with label dyeing. Show all posts

Friday, 22 April 2016

April ....something blue....

I have been lucky enough to join Oak House Studio for their "Take Five" event. For the next five months five different designers will be challenged to use Oak House products on a chosen theme.....and I will be joining April's theme "something blue".
This has been a massive excuse to lock myself away with not only some of the very unique Oak House Stamps but their gorgeous, fantastic inks....so much fun in one little bottle ....and no I don't mean wine....good obviously ...but this is so much better for you....although if you don't wear rubber gloves (I DON'T) you will have an attack of the inky fingers.....who cares...I love it!!!!
I have had so much fun, splatting, spraying dipping, dripping, dunking and dying....the possibilities are endless and I haven't limited myself to papercrafting.


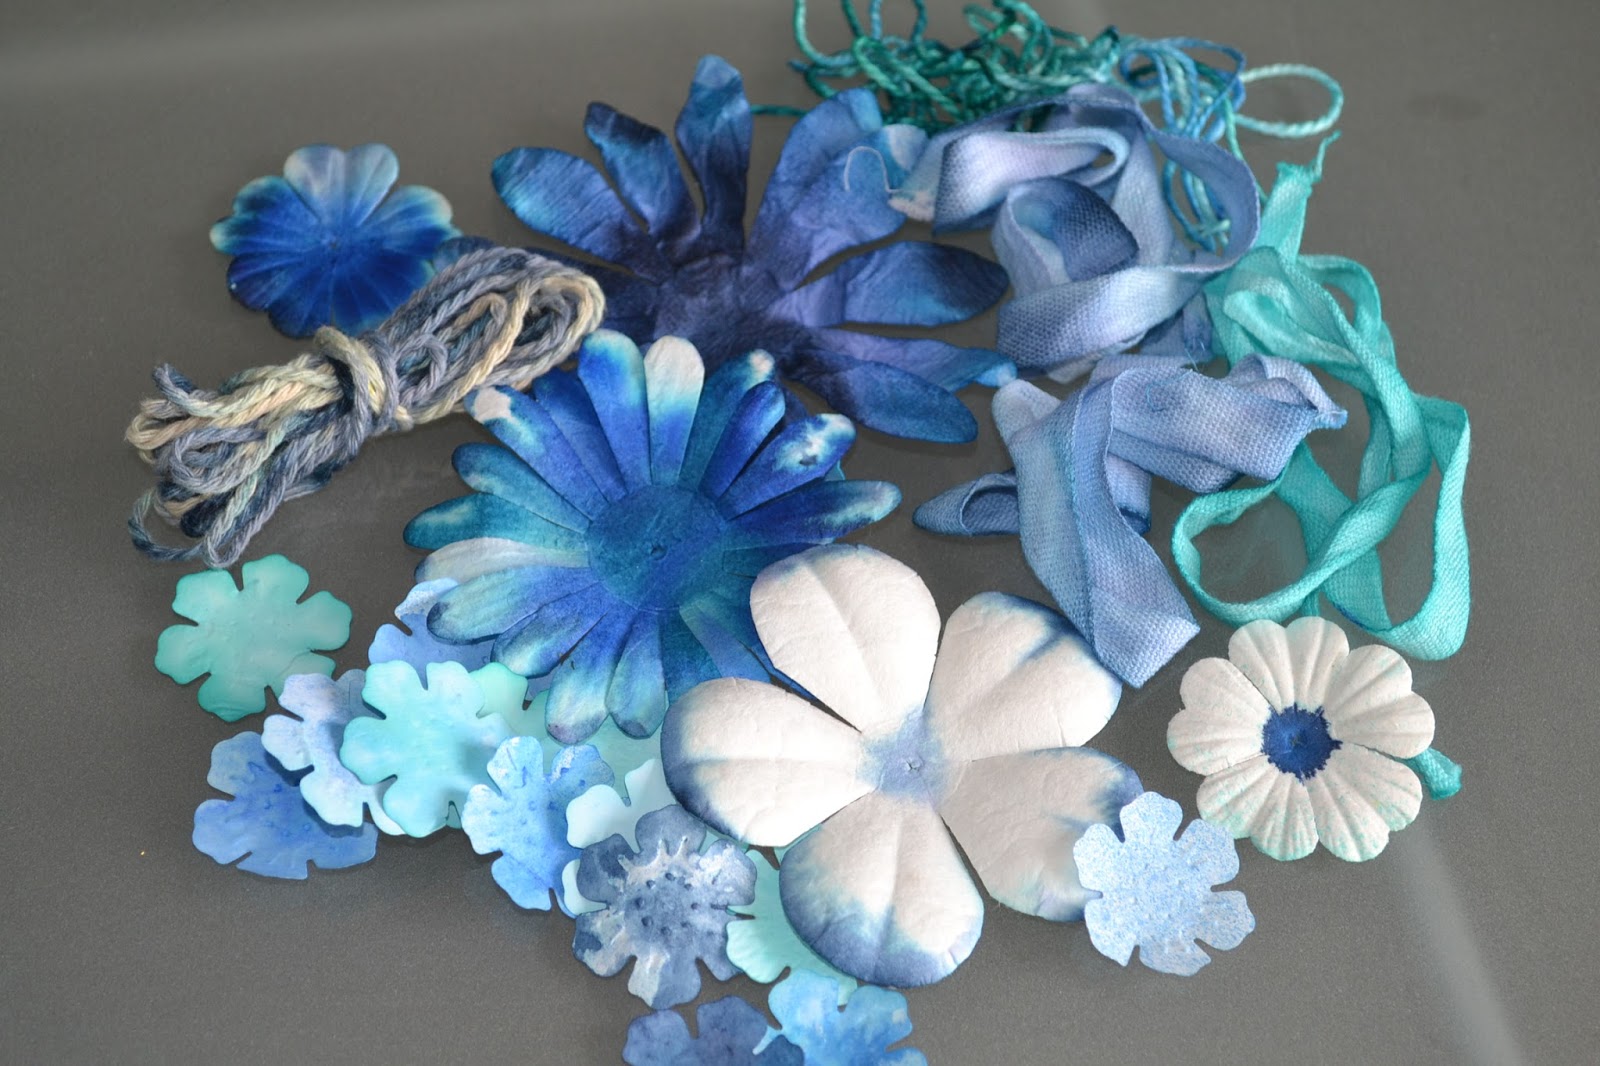
Oak House very cleverly now sell all their inks in concentrated form which you can make into full bottles of regular strength spritzing ink plus have tons left over to use in different ways. I have been painting with them, dying paper, ribbons embellishments etc., adding them to different mediums and fully exploiting the fact you can dilute to change the intensity and mix the colours to create an incredible variety.

On the blog I made a CAS card with an inky background but I haven't got an envelope
 (I think I have warned you previously....don't store ALL your envelopes somewhere damp and cold....they like to seal themselves.....grrrr any one want to buy a couple of hundred pre-sealed envelopes?!)  .......so as this is my crafting on a budget blog I thought it would be good to make the envelope for my card and in contrast it would be ornate.

 This bit of paper was destined for the bin, it was just a protective backing piece when I was working but I loved it already had a panel masked out for writing the name.
Unfortunately it's not big enough ...time to get creative....using a scrap of paper and Oak House Pure Gold Acrylic ink (love this bottle of liquid gold....so shiny in real life) and a scrap of sponge,  I inked over the O.H. Thorseby Backgound stamp then spritzed over with diluted Jubilee Blue and Hey presto....instant posh verdigris....what fun...not intentional but one to remember....particularly as there is "rusting" technique I want to try.
 
Quite simply I glued the stamped panel over the top of the folded inked paper (fold edges in to form a slight overlapped join at back, then seal bottom edge with double sided tape), trim sides to match pouch and fold to create the flap.
....who needs proper envelopes.... ;-)

Check out the Oak House Studio Blog for my "bespoke" dyed tissue paper gift wrap,  plus all the other designers projects this month.....and of course the Shop for the amazing inks.


My card is also on the blog and I'd like to enter it into Hiding in my Craftroom's  "LOL" challenge.... it has actually got four layers (base, dyed panel, silhouette panel & word tab) ....this is quite a lot for me....not great with layers!!!!!!
....thanks for popping by :-)


Friday, 6 April 2012

Playing around…

You know the saying it’s not where you start its where you finish…well actually this week it’s more about where I started than where I finished. It’s been another mad week and I have had an idea buzzing in my head this week that I wanted to play with and it has been a case of flying in my craftroom whenever possible to have a little messy play.

It all started at the weekend when we assaulted a large Camellia in our garden. We tried to transplant it in Katie's cottage garden…..it didn’t go willingly and I fear for it’s survival but it was completely hidden in our jungle, the blooms are so beautiful so it was a shame to have it out of sight.

When I saw Less is More’s fabulous Picture inspiration this week I knew I had to have a go at capturing the beauty of the blooms in paper….ha ha.. easier said than done, especially without my crafting tools….reeeealllllllllly wanted to use my cricut but “hey ho” it was out with the scissors for a play.

S1052552I’m a big fan of Petaloo and Prima flowers and I have quite a lot of them but often never the right size or colours, so it was time to experiment making my own…the first one was a quick trial and actually ended up adorning the pot of sugar scrub which I had made as part of a friends present…

S1052568

I then had further play with some scraps of paper, exploring folds, multiple layers and different cuts…..not sure any of them actually look like Camellias but I have had a lot of fun creating them.  I found they moulded better  dampened and once dry they actually became quite robust.

TOP TIP no. 1…. if speeding up the drying process….don't put them under the grill S1052562and forget about them…the smell of scorched paper can last a long time in a house and having to leap about frantically trying to shut the smoke detector up is very frustrating…. but hey I think I have invented a new style of vintage flowers.


S1052558…the other conundrum was how to create the centres (this is how I got distracted from the grill!)…while I was in the kitchen I decided to dig out my food colouring and create some “pseudo” glitter with salt. I put a few drops of food colouring on table and rock salt….also tried some rice…this time I left it to safely dry on a radiator!!! …boring… had to wait till the next day in fact I had to tip it onto paper which did bleed some of the colour out but I was quite pleased with the end result. Trouble is when I put the salt on the wet glue, the rest of the colour bled out…so it was back to the drawing board…and quite honestly it was easier to just add the food colouring and salt directly to the glue.

TOP TIP n0. 2 Salt and Book Binding glue doesn't work…although NASA might be interested in the new “flubber” that I have invented!!!

I have spent so much time playing that actually there is very little time to make a proper flower and card, so this has to be the prototype card for the challengeS1052567

The great thing about renovating the cottage is I keep finding things I want to use in my papercrafting….The flower is mounted on a piece of Plasterboard “Scrim”, which quite handily is self adhesive…it reminded me of “Magic Mesh”…do you remember that trend, it was a long time ago…(bought some but never really used it!!! and I have to say I like the scim better).

I want to say a big thank you to Chrissie and Mandi for showcasing my card this week, but more importantly, for running such a wonderful challenge and the dedication you both have to everyone who joins in.  I truly appreciate your advice and comments.  Equally I appreciate the fabulous camaraderie that has developed from the challenge. I can’t express enough how much I appreciate people taking the time to visit me and tolerating my “homemade” approach to cardmaking.  I LOVE the inspiration I get from visiting other blogs, I only wish I could visit more, I try and get to see as many as I can.

Finally…particularly FAO: Jenny…remember “WOYCRF” (what’s on your craft room S1052569floor) …well this week its………………………..


TOP TIP no. 3 …when tipping dyed salt into a bag…remember to have the bag open!


Monday, 7 December 2009

Paper dyeing

I thought I would post some pictures of some cards I made a couple of years ago, but as they primarily use papers for the technique, I thought they would be useful. Some of the cards do have a little stamping on them but the cards could easily be recreated without.
Essentially the technique involves non-colourfast papers. By applying water to the paper the dye can be transferred to another card. Tissue paper and crepe paper are best for this technique but it could be tried with other papers
Creating backgrounds is the easiest method to try first. Wet a fairly sturdy piece of cardstock with a paint brush and water, then lay strips of tissue to create scenery or try using scrunched up scraps and overlaying and dabbing to create different effects. It's worth practicing on a scrap of card first to judge how much water is needed and how intense the colour is. Both techniques require enough moisture to make the dye bleed out, but don't forget, when paper or card is damp it warps, so its worth allowing a bit of time for the dyed base card to be allowed to dry, then flattened under some heavy books before you continue to work on it

Shapes can be slightly fiddly and complicated to do, I normally lightly moisten the shape in the centre, position it on the base, then carefully with a wet brush(don't over wet the brush, the colour may bleed out from the edges, and although this can look effective it may not be the look you are after) paint over the shape working carefully to the edges. Either leave the shapes in place to dry or when the desired effect/colour is achieved peel the shapes off. Shapes can also be dyed separately then cut out to create embellishments
Mask off areas or work over a stencil to create dyed areas

And this is how i discovered paper dyeing......
I hadn't got any suitable backing paper for this picture so after several disappointing stamping and painting efforts I decided to stick on tissue paper circles...trouble was, it wasn't colour fast and the glue made the dye bleed...but I liked the natural light and shade the circles were creating so I started again but this time just sticking them down with water. Once they were dry I lifted them off...hey presto... spotty paper!!

This precious scrapbook page is of my husband (much younger!!!)and my daughter Gina, on the very first Red Nose Day. Gina was so excited , but the trouble was her own nose was a bit too small to keep the plastic one on, so she spent the whole time with it balanced on top of her nose and her head tipped back. She loved red nose day and collected a nose every year until the year she died....she thought they would become collectors items and said when she was old she would auction them off for charity...perhaps one day I will be able to grant her wish...I know they are still amongst her treasures.

So don't forget when unwrapping your pressies on Christmas Day, grab any coloured tissue, doesn't matter if it's crumpled..... and fingers crossed it's not colour-fast!!